General Grid Controls
Grid Controls is a feature that allows the control of the columns presented in any IPM Grid. IPM Grids are distinguished by facilitating what is referred to as inline editing or what is more commonly referred to as and Excel like editing experience where the user can simply tab through the fields in a table without having to open each record in a separate window.
Below is a typical "IPM Grid" this one is specifically from the Purchase Order entry form.
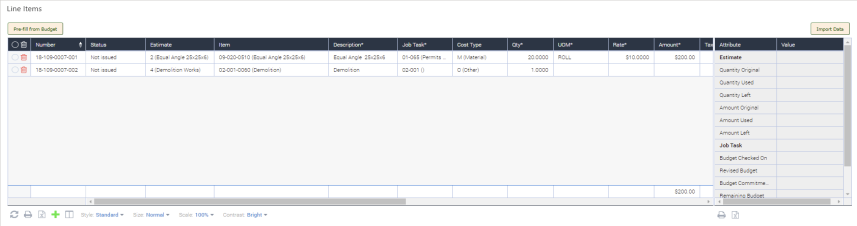
A common request is to either add additional columns to these grids and make some change either to the formatting or the calculations. These can all be controlled using the IPM Grid Settings.
Navigating to IPM Settings> IPM Grid Settings will bring you to a list of the 46 grids controlled by IPM throughout the system as below.
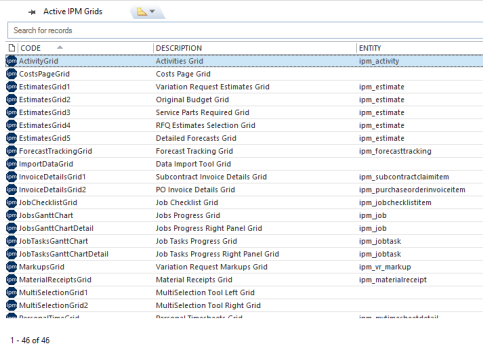
To understand which grid to modify you need to identify the form that the grid is used on by looking at the "Description" column in conjunction with the entity. You will note that the entity alone will not be of much use in many situations because the same entity is represented a number of times, the ipm_estimate entity is a prime example of this.
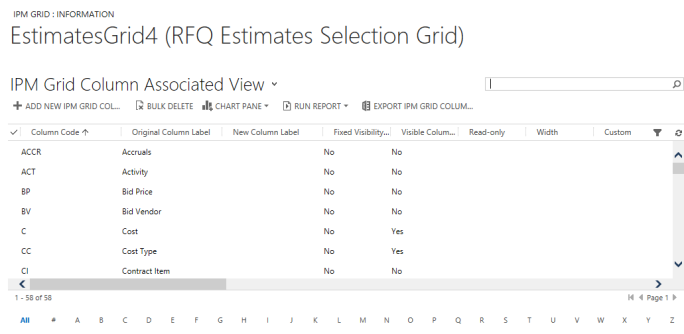
Once you have identified your target and double clicked to open it you are presented with a list of fields.
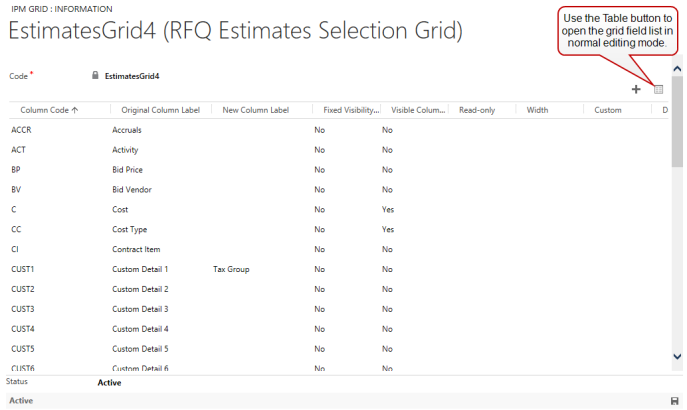
In this mode multiple edits can be carried out simultaneously by selecting multiple fields and then selecting edit. This approach can be used to make a number of fields not visible by default for example, turning off all Multi-currency fields can be done in a matter of seconds.
Individual Field Attributes
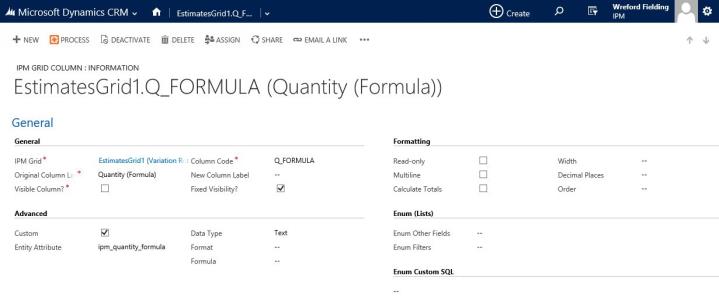
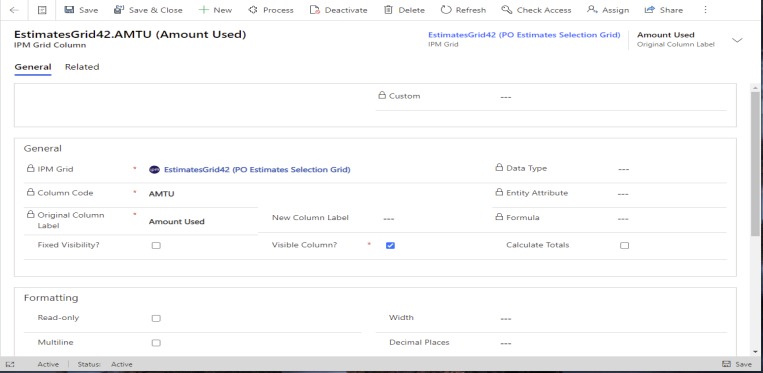
Each field has a number of attributes which will control its behaviour as presented in the image below.
General
The General Attributes include:-
- IPM Grid. This is fixed and represents the Grid you are currently editing.
- Column Code. This must be specified and unique to this grid and should be capital letters. The is the code used to reference this field in any formulas for this grid.
- Original Column Label. This is the original label provided by IPM.
- New Column Label. This attribute can be amended to relabel the column on the screen when the grid presents.
- Fixed Visibility. This controls whether a field is fixed on the grid and cannot be removed based on the Visible column property.
- Visible Column. This controls whether the column is available to be selected to include in the grid from the column selection button. Fields that do not have this selected are not going to be available either to view or enter data into.
Formatting
The Formatting Attributes are:-
- Read Only. This controls whether the user can enter data into this field. if the column is initially read only it is not possible to change it using this attribute.
- Width. This controls the width of the field when first displayed. Please note that although this can be altered during data entry these alterations are not persistent. If a value is not specified then the default setting will be used.
- Multi-line. This is only used where the field type is text and controls whether the field wraps during data entry. If selected as a multi-line text field the inbuilt spell checkers available in browsers will identify any unidentified words by underlining them in red.
- Decimal Places. This controls the number of decimals presented in the grid for any numerics. Please not that this will not make an integer field into a decimal even if it does display with decimal places.
- Calculate Total. This is only effective for numerics but if selected, with show a total in the total bar at the bottom of the grid.
- Order. This controls the order of the columns as they are presented across the page. Please be aware that if you resort the columns manually then these changes are not persistent.
Advanced
The fields in the advanced section require a little more understanding of technical issues.
- Data Type is used to identify to the grid control the sort of data being presented in this field. If a custom field has been added to an entity and is to be presented in the grid, it is important that the appropriate data type is nominated here in order for the grid to present it correctly. Incorrect selection of the data type can cause errors on loading the grid.
- Entity Attribute is the schema name for a custom field being included on the grid. This should be blank if the field is a virtual/calculated field
- Format controls how the field is to be formatted, For example, if a $ symbol is placed in this field then the field will show as a currency field even if it is only a decimal number.
- Formula is used to define a calculated field. Calculated fields are virtual fields which may represent the sum or product of a number of other fields.
Enumeration (Lists)
The enumeration section is used to define the values of drop down lists to be included in the grid. So a field may be a lookup field but you would like the lookup to show additional fields and the list to be filtered for a specific job for example, then the Enum Other fields can specify additional fields to show and enum Filters can be used to define what appears on the list. In the same way, the custom SQL can be used to retrieve the list from another entity. More details as to how this option works will be provided at a later date.
Adding a Virtual Field
Use the following steps to add a virtual field to a grid
- From the field list for a grid, Select the new field button from the Ribbon Bar
- In the general section:-
- Give your field a code. This is mandatory and must be unique within this grid.
- Give your new field a name. Make it relatively short so that you can refer to it later in formulas
- Record the label that you wish to use as the column header as the original column label
- Choose to make the column visibility settings as required.
- In the Formatting Section:-
- Set Read Only if required/
- Set the width to suit your data entry requirements
- If the field is a text field then choose the Multiline behaviour required.
- If the field is a numeric then determine the appropriate settings for decimal places and calculate totals.
- In the advanced settings:-
- Set the data type to suit your desired field type.
- Record the formula for this field if there is one.
- Choose the appropriate field format, Currency etc.
- If the field is a drop down set the enumeration properties.
- Formula Syntax
- Addition Syntax ColCode1 + ColCode2
- Subtraction Syntax ColCode1 + ColCode2
- Multiplication Syntax ColCode1 * ColCode2
- Divisiton Syntax ColCode1/ColCode2 however this may result in divide by zero error so to avoid this please use ((((ColCode2!=0)?ColCode2:0)!=0)?Math.round((ColCode1/ColCode2)*100)/100:0)
- Mixed Calculation operations should use brackets to establish execution orders E.G. (ColCode1-ColCode2)*ColCode3
Adding a Custom Field
Use the following steps to add a virtual field to a grid
- Add your field to the entity taking particular note of the schema name for the field and the data type.
- From the field list for a grid, Select the new field button from the Ribbon Bar
-
- In the general section:-
- Give your field a code. This is mandatory and must be unique within this grid.
- Give your new field a name. Make it relatively short so that you can refer to it later in formulas
- Record the label that you wish to use as the column header as the original column label
- Choose to make the column visibility settings as required.
- In the Formatting Section:-
- Set Read Only if required/
- Set the width to suit your data entry requirements
- If the field is a text field then choose the Multiline behaviour required.
- If the field is a numeric then determine the appropriate settings for decimal places and calculate totals.
- In the advanced settings:-
- Set the data type to suit your desired field type.
- Record the schema name exactly as it was added in the customisation area,
- Record the formula for this field if there is one.
- Choose the appropriate field format, Currency etc.
- If the field is a drop down set the enumeration properties.
-
Here is correct Enum Filter syntax for an Enum Grid Custom column (if 3 “AND” conditions must be met
-
["ipm_jobid", @ipm_jobid];["ipm_type", "1"];["ipm_erpsystemid", @ipm_erpsystemid]
-
@ipm_jobid and @ipm_erpsystemid variables are determined in the Grid DLL for the whole Grid: when there is one Job that can be determined for the whole Grid
-
["ipm_type", "2"]
-
So we had to use double quotes for both attribute name and value
-
For ipm_jobcontact and ipm_contact enums you can specify parameter “ipm_type” with the following values:
-
1 – to get CRM Accounts only
-
2 – to get CRM Contacts only
-
8 – to get CRM Users only
-
Or Any combination of 1/2/8 in any order:
-
12 is the same as 21 – to get CRM Accounts and CRM Contacts, but not CRM Users
-
18 is the same as 81 – to get CRM Accounts and CRM Users, but not CRM Contacts
-
28 is the same as 82– to get CRM Contacts and CRM Users, but not CRM Accounts
-
128 is the same as 182 or 281 or 218 or 812 or 821 or ALL – to get all records
-
- In the general section:-
Grid Custom JS
There are 3 events that can now be customised for each IPM Grid:-
- OnEndEdit is executed after a field has been edited but before you exit the cell.
- OnValueChanged is executed when a value in a cell is changed but before it is accepted. This is usually used as a result of a drop down list selection or date selection.
- OnAfterValueChanged is executed after the change to a value has been completed.
These events and the associated JavaScript are a highly technical topic and we do not seek to provide instruction in JS editing as part of this documentation however the following are simple examples and scenarios that will provide some guidance as to how this very powerful feature can be used.
Storing Formulas in Grids
In version 6.1.0.4 the ability to use an excel like formula function in a grid cell was added. This function allows the use of the "=" button to open a dialogue to key a formula into a cell. That formula can be stored for future reference by making a few minor changes. The following steps outline the process for storing formulas for a particular cell.
- For each cell that you want to store the formula, you must add a text field so for my example to store a formula for the quantity field used on the variation/change order request grid add a field to the estimate entity called xxx_quantity_formula where xxx is your default field prefix. The display name for this field should be (fieldname) Formula so in this example it is Quantity (Formula) and is data type "Single Line of Text". Publish your customisations.
- For each grid that you want to use this formula storing feature on you need to modify the grid settings. Go to IPM Settings> Grid Settings and select the Grid to modify. For this example I have used the EstimatesGrid1 which is the Variation Request Estimates Grid.
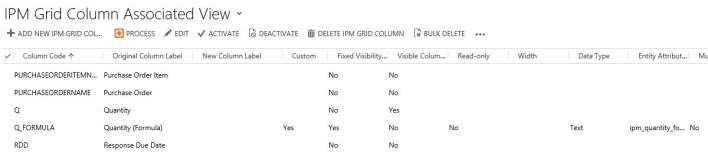
- Based on the images below a new column needs to be added to the grid. The column the contains the numeric value is called Q so the new column needs to be Q_FORMULA.
- The label can be the same as the field description we added when we added the field so Quantity (Formula).
- Visible column should not be set but Fixed Visibility should be on. It will be added as a custom column and the attribute name is what we added when we added the field to the Estimate entity so xxx_quantity_formula.
- Save the new column, clear you cookies and cached internet files and test.