Installation - WEB.CONFIG file
The installation instructions below assume the starting point of a working CRM deployment either inhouse or IFD.
Download required software
The IPM files could be found at ftp://ftp.ipmglobal.net
Download and then extract these files into a working directory such as C:\IPMInstalls
ftp://ftp.ipmglobal.net/IPM%20Current%20Supported%20Versions/ipm6_2_0_x.zip (or later)
ftp://ftp.ipmglobal.net/IPM%20Document%20Uploader/Document Uploader for IPM.zip
ftp://ftp.ipmglobal.net/IPM%20Mail%20Manager/Mail Manager Setup 6.1.0.4.zip (or later)
ftp://ftp.ipmglobal.net/IPM%20Plugins/PluginRegistrationRool2011.zip (or later)
Download and then extract these files into C:\support\IPM\Solutions
ftp://ftp.ipmglobal.net/IPM%20Forms_Reports_Workflows/IPMReports_6_2_0_x.zip (or later)
ftp://ftp.ipmglobal.net/IPM%20Forms_Reports_Workflows/IPMWorkflows_6_2_0_x.zip (or later)
(Note that some file names and folders may change slightly, if required check with IPMGLOBAL on the correct files to use)
Installers
Unzip the IPM6_2_0_x.zip
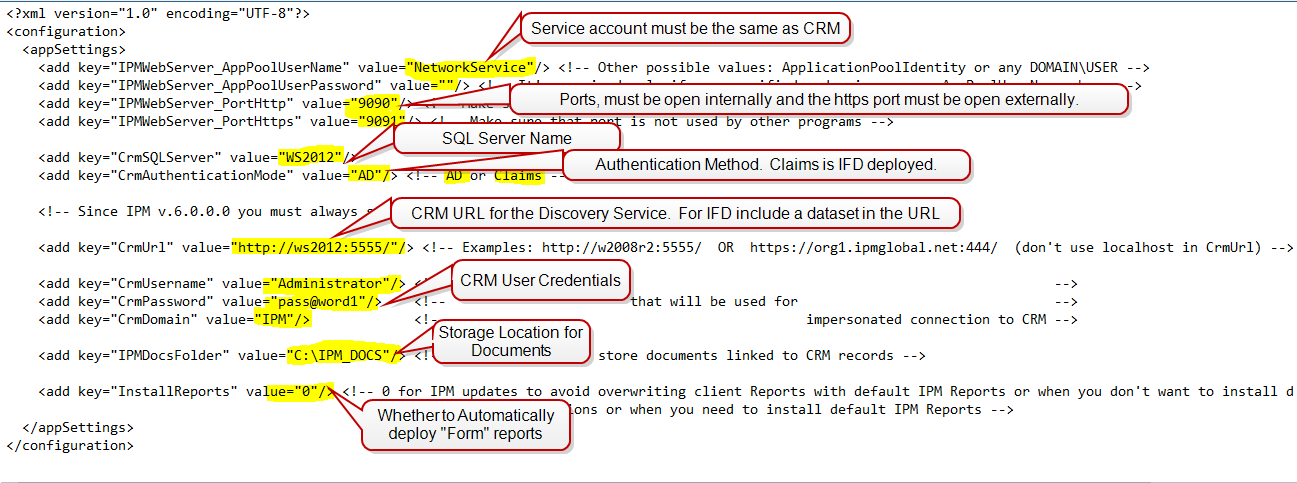
Open c:\IPMInstalls\ipm6_2_0_x\IPMGlobal.IPM_MSCRM.Setup and edit ipm.config file
Update the Highlighted fields below (Comments have been excluded from example for space)
Create C:\IPM_DOCS and C:\IPM_LOGS folders and give USERS Full control.
Check port 9090 & port 9019 are not in use by running the below in a command prompt
netstat -n -a | findstr "9090"
netstat -n -a | findstr "9091"
You should get no results
Add the service account (SVC_CRMIPMSync) as a CRM user with the system admin role.
Install IPM
Run as admin
C:\Support\IPM\ipm6_2_0_3\IPMGlobal.IPM_MSCRM.Setup\Setup64.exe
If you get an error check you can browse http://localhost:9090 and https://localhost:9091
You may need to rebind the certificate on the HTTPS binding within IIS
Double check the setting in your ipm.config file and try the install again until you don’t get an error
Browse to SSRS EG Http://reports.ws2012/reports
Browse to /IPMGlobal/IPM_MSCRM
Create a folder for {OrgName}
Copy entire C:\Program Files\IPM Global\IPM for Microsoft Dynamics CRM\Data\Reports to C:\Reports
Run IPMGlobal.CRM2011.IPM.ReportsManager.exe as Admin
Click “Upload Reports”
Click “Detect Settings”
Add the OrgName to the end of the “Server Reports Folder”
Click “Upload Reports”
Install IPM configuration Manager
Run as admin
C:\Support\IPM\ipm6_2_0_3\IPMGlobal.IPM_MSCRM.ConfigurationManager\setup64.exe
Open CRM in a browser. Browse to Settings / Solutions
Import Solution
C:\Program Files\IPM Global\IPM for Microsoft Dynamics CRM Configuration Manager\Data\Solutions\Solution1_2015.zip (Where 2015 is your version of CRM)
Next, Import
This can take some time
Import 2nd solution
C:\Program Files\IPM Global\IPM for Microsoft Dynamics CRM Configuration Manager\Data\Solutions\Solution2_2015.zip
Publish all customizations
Run “IPM for Microsoft Dynamics CRM Configuration Manager” as admin
Create a new profile for your CRM environment. You can use the service account for your VERDEIPM account, be sure to tick IFD. Retrieve Organizations, OK
Add the relevant web server URL, if IFD add IFD url http://ipmweb.domain.com:9090 and https://ipmweb.domain.com:9091 and start configuration process, once completed leave screen open
Add the IPM (Full) role to the system admin user (VERDEIPM) and service account (SVC_CRMIPMSync)
Go to IPM License File Importation
(CRM IPM Settings open the only record
Click ‘IPM License import’
Browse to C:\Support\IPM\Licensing and select and import (one at a time in order)
1) Server License
2) User License
3) Integration License (Integration license only if you are integrating with Accounting systems)
4) Mail Manager license (If provided)
Go back to IPM configuration Manager you left open, and import System Data