Creating a Daily Report/Site Diary
Use the following steps to create a new Daily Report for a Job:
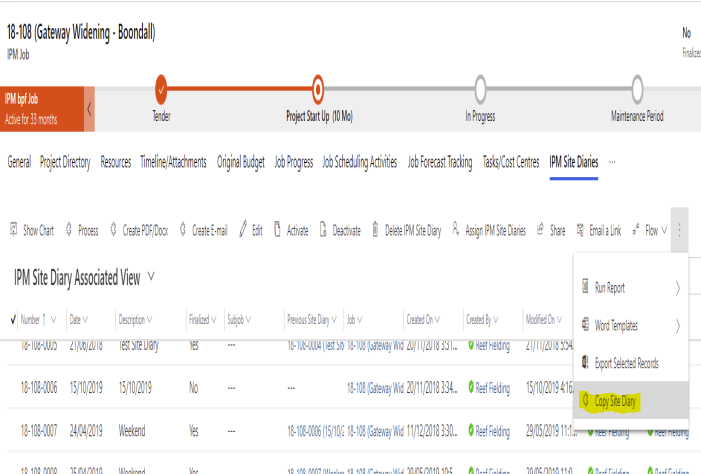
From Outlook in the left hand navigation menu or from the drop down menu through a browser, click on IPM Document Control > Daily Report and click "New"or select an existing Daily Report and use the "Copy Site Diary" button ..
- If Creating from Scratch select the Job you want to create the Daily Report for from the list unless the field is prefilled.
- The Job name is automatically filled in for you according to what you selected from the drop down menu
- If this is the first Daily Report for that Job, IPM will assign the number as job number-0001. If there are previous Daily Reports for the Job, IPM will automatically assign the next sequential Job number to your Daily Report (this can be edited if you wish)
- The Date will auto fill to today’s date, but you can change this by clicking on the Calendar
- Click Save to gain access to the other components of the Daily Report in the top ribbon menu
To Add Labor Information
If you copied the daily report from a previous day, some records may be prefilled. Labour is an area that programmatically is copied from a previous daily report. If this is the first daily report for the project a blank grid will be presented.
If the Labor Section has not been revealed Click on the Labor heading to expand
- Click on the plus symbol on the toolbar
 at the bottom of the grid to add a new row
 - Enter information by clicking in each cell and either selecting from the drop down list or typing into the cell
- Once you have finished each line, continue adding new rows by clicking the plus symbol at the bottom of the grid
- Once you have finished entering the necessary Labor information there is no need to save as the grid saves automatically.
To Add Equipment Information
If you copied the daily report from a previous day, some records may be prefilled. Equipment is an area that programmatically is copied from a previous daily report. If this is the first daily report for the project a blank grid will be presented.
If the Equipment Section has not been revealed Click on the Equipment heading to expand
- Click on the plus symbol on the toolbar at the bottom of the grid to add a new row
- Enter information by clicking in each cell and either selecting from the drop down list or typing into the cell
- Once you have finished each line, continue adding new rows by clicking the plus symbol at the bottom of the grid
- Once you have finished entering the necessary Labor information there is no need to save as the grid saves automatically.
To Add Weather/Site Conditions Information
- Click on Weather/Site Conditions in the drop down menu of the new Daily Report
- Click on Add New IPM DR Weather/Site Condition in the top menu
- This will open the New Weather/Site Condition form
- The Date will auto fill to the date you entered in the information section of the Daily Report above, but you can change this by clicking on the calendar
- If applicable, enter a start and end Time for the conditions
- Select the type of Weather from the drop down menu
- If applicable, you can select the Ground Condition, Humidity, Wind and Sky from the drop down menu
- You can enter a Temperature and select the unit of measurement from the drop down menu
- You can enter the Precipitation and the Precipitation Unit of Measure if necessary
- In the Remarks field, you can add any other relevant information
- Click Save and Close if this is the only condition to add, or Save and New if you wish to add more. The Weather/Site Condition will now appear in the table of Weather/Site Conditions for the Daily Report
To Add Subcontractors Information
- Click on Subcontractors in the drop down menu of the New Daily Report
- Click on Add New IPM DR Subcontractor in the top menu
- This will open the New Subcontractor form
- The Date will auto fill to the date you entered in the information section of the Daily Report above, but you can change this by clicking on the calendar
- Click on in the Subcontractor field and select the subcontractor from the list
- Click OK
- Select the subcontractor’s Trade from the drop down list
- Click on in the Job Task field and select the task from the list
- Click OK
- If applicable, enter head counts for the Foremen, Journeymen and Apprentices of the Subcontractor and the hours worked
- In the Remarks field, you can add any other relevant information
- Click Save and Close if this is the only Subcontractor to add, or Save and New if you want to add more. The Subcontractor information will now appear in the table of Subcontractors for the Daily Report
To Add Materials Information
- Click on Materials in the drop down menu of the New Daily Report
- Click on Add New IPM DR Material in the top menu
- This will open the New Materials form
- The Date will auto fill to the date you entered in the information section of the Daily Report above, but you can change this by clicking on the calendar
- Enter the Ticket Number
- Enter the Received Time
- If applicable, enter the Quantity and Quantity Unit of Measure by clicking on and selecting from the list
- Enter a Description of the materials
- If applicable, enter a Purchase Order by clicking on the and selecting from the list
- Click on in the Purchased From field and select the contact from the list
- Click on in the Freight Company field and select the contact from the list
- Click on in the Received By field and select the contact from the list
- In the Remarks field, you can add any other relevant information
- Click Save and Close if this is the only Materials information to add, or Save and New if you want to add more. The Materials will now appear in the Materials list for the Daily Report
To Add Work Activities and Progress Information
- Click on Work Activities and Progress in the drop down menu of the New Daily Report
- Click on Add New IPM DR Work Activity in the top menu
- This will open the New Work Activity form
- The Date will auto fill to the date you entered in the information section of the Daily Report above, but you can change this by clicking on the calendar
- Enter a Description of the Work Activity
- Click on in the Responsible Company field and select the contact from the list
- Click on in the Job Task field and select the task from the list
- Once the Job Task has been added, the Current Percentage Complete and Current Production Units in Place fields will automatically update according to the information entered for the Job Task (for more information see Chapter 4, 1.3.4). You can then update the New Percentage Complete and New Production Units in Place fields according to how much work this activity contributes to the Job Task.
- Note: Once the Daily Report is finalized, the Percentage Complete and Production Units information you enter here will automatically update in the Job Task form as well
- If adding Production Units, click on in the Production Units UOM field and select from the list
- If necessary, add any Remarks
- Click Save and Close if this is the only Work Activity to add, or Save and New if you want to add more. The Work Activity will now appear in the list of Work Activities and Progress for the Daily Report
To Add Work/Change Orders Information
- Click on Work/Change Orders in the drop down menu of the New Daily Report
- Click on Add New IPM DR Work/Change Order in the top menu
- This will open the New Work/Change Order form
- The Date will auto fill to the date you entered in the information section of the Daily Report above, but you can change this by clicking on the calendar
- Select the Type from the drop down menu
- If there are multiple Work/Change Orders, enter a Number
- You can assign the Work/Change Order to a particular Change Request by clicking on and selecting from the list
- Enter a Description of the Work/Change Order
- Click on in the Subcontractor field and select the Subcontractor concerned with the Work /Change Order
- In the Remarks field you can add any relevant information
- Click Save and Close if this is the only Work/Change Order to add, or Save and New if you want to add more. The Work/Change Order will now appear in the list of Work/Change Orders for the Daily Report
To Add Events Information
- Click on Events under the Details section of the Daily Report
- Click on Add New IPM DR Event in the top menu
- This will open the New Event form
- The Date will auto fill to the date you entered in the information section of the Daily Report above, but you can change this by clicking on the calendar
- If applicable, enter a From Time and To Time for the Event
- Select the Event Type from the drop down menu
- If the Event concerned an employee, click on in the Employee field and select the person from the list
- If the Event concerned a piece of equipment, click on in the Equipment field and select the equipment from the list Note: If the Equipment is not in the list, see Chapter 7, 12.0 for how to add new resources
- If applicable, enter an Equipment Description
- If there was another party involved in the Event, click on in the Party Involved field and select the contact from the list
- In the Remarks field you can add any other relevant information
- Click Save and Close if this is the only Event to add, or Save and New if you want to add more. The Event will now appear in the list of Events for the Daily Report
To Add Visitors Information
- Click on Visitors under the Details section of the Daily Report
- Click on Add New IPM DR Visitor in the top menu
- This will open the New Visitor form
- The Date will auto fill to the date you entered in the information section of the Daily Report above, but you can change this by clicking on the calendar
- Enter an Arrival and Departure Time
- Enter the number of Visitors
- If applicable, click on in the Visiting Company field and select the company from the list
- Click on in the Visiting Person field and select the contact from the list
- If there is an internal contact for the visitor, click on in the Internal Follow-up Contact field and select the contact from the list
- In the Remarks field you can add any other relevant information
- Click Save and Close if this is the only Visitor to add, or Save and New if you want to add more. The Visitor will now appear in the list of Visitors for the Daily Report
To Add Journal Entries
- Click on Journal Entries under the Details Section of the Daily Report
- Click on Add New IPM DR Journal Entry in the top menu
- This will open the New Journal Entry form
- The Date will auto fill to the date you entered in the information section of the Daily Report above, but you can change this by clicking on the calendar
- If applicable, enter a Time of the delay, unusual conditions, subcontractor performance etc.
- Select the Category from the drop down list
- Enter a Description of the delay, unusual conditions, subcontractor performance etc.
- If applicable, enter any Remarks
- Click Save and Close if this is the only Journal Entry to add, or Save and New if you want to add more. The Journal Entry will now appear in the list of Journal Entries for the Daily Report
To Add a Send To Contact
- If you wish to send your Daily Report to someone, click Send To in the drop down menu of the Daily Report form
- If you wish to send your Daily Report to multiple contacts, you can use the Multi-Select tool by clicking on IPM Multi-Select in the top menu (see Chapter 2, 5.3 for more information)
- If you wish to only add one contact, you can do so individually by clicking on Records > Add New IPM Daily Report Send Contact
- Click on in the Job Contact field to search for contacts in your list
- Select the contact and click OK
- You can select the Recipient Type from the drop down menu, otherwise it will default to CC
- Click Save and Close if this is the only contact to add, or Save and New if you need to add more contacts
- To send the Daily Report, see Chapter 3, 7.6)
Once all Components of the Site Dairy have been added, click Save and Close to close the New Daily Report form. The Daily Report you have created will now appear in the table in the Site Dairy section under the selected Job.