How to Create a Purchase Order
Use the following steps to create a new Purchase Order for a Job:
- In the drop down navigation menu, click on IPM Contract Control > Purchase Orders
- Select the Job you want to create the Purchase Order for from the drop down menu (once you have done this, all other screens will automatically select this Job)
- Click on New IPM Purchase Order
- This will open the New Purchase Order form
- The Job name is automatically filled in for you according to what you selected from the drop down menu
- If this is the first Purchase Order for that Job, IPM will assign the Number as job number-0001. If there are previous Purchase Orders for the Job, IPM will automatically assign the next sequential number (this can be edited if you wish)
- The Date will auto fill to today’s date
- Select the Status of the Purchase Order from the drop down box. Note: If IPM is integrated with your accounting software, once the Status has been selected as Approved, the Purchase Order will pass through to the accounting system. If IPM is a standalone system, this will simply show as Approved for your own records in IPM.
- To select a contact who is supplying the items in the Purchase Order, click on in the Vendor field and select the contact
- Click OK
- Enter a brief Description of the Purchase Order
- If necessary, click on in the Delivery Address field and select the delivery address from the list
- The ERP System is automatically added according to the ERP System selected for the Job
- Click on the Schedule tab and add any necessary schedule information Note: The information in the Invoices Info tab will be automatically filled in when other sections of the Purchase Order are completed
- Click Save to gain access to other parts of the Purchase Order
To add PO Items
Once you have saved the initial information of your Purchase Order, you can add details of the specific items the Purchase Order is for. Use the following steps to add items to your Purchase Order:
- Click the PLUS button on the Line Item Grid Toolbar

- Much of the Information from the Purchase Order has already been filled in for you
- The Number will be automatically assigned by IPM in the following format: Job number-PO Number-PO Item Number, but this can be changed if you wish
- Select the Status of the Purchase Order Item from the drop down menu
- If this Item relates to an Estimate from a Change Request, click on in the Estimate field and select the Change Request from the list. Note: If a Change Request is added to the Estimate field, the Description, Job Task, Cost Type, Quantity, Rate and Amount will automatically fill according to the information in the Change Request
- In the Product field and select the type of product if choosing from the products table
- If there is no Estimate information to add, manually enter a Description of the Item
- In the Job Task field and select the Job Task that the PO Item is associated with
- In the Cost Type field and select the Cost Type that the PO Item is associated with
- Enter the Quantity of PO Items you will be ordering
- In the Unit Of Measure field and select the Unit of Measure for the PO Item
- Enter the cost of each unit in the Rate section
- The Amount will then automatically update according to the Quantity and Rates entered
- If applicable, enter a Delivery Date by clicking on the calendar
- If you are using an integrated system, there may be fields in your accounting system that are not in IPM, such as Tax information. By clicking on in the Custom Detail 1 and 2 fields, you can add a detail that may be needed for your accounting system to process the Subcontract, such as GST Free, or GST 10%
To add a Send To Contact
Once you have saved the information section of the Purchase Order, the contact who was entered as Vendor is automatically entered as a Send To Contact. If you wish to send your Purchase Order to other contacts, follow the steps below to add their details to the Purchase Order:
- Click Send To in the drop down menu of the Purchase Order form or follow the same steps but through Distribution at the bottom of the form (under Distribution and Library Documents)
- If you wish to send your Purchase Order to multiple contacts, you can use the Multi-Select tool by clicking on IPM Multi-Select in the top right corner
- If you wish to only add one contact, you can do so individually by clicking on Records > Add New IPM Purchase Order Send Contact
- Click on in the Job Contact field to search for contacts in your list
- Select the contact and click OK
- You can select the Recipient Type from the drop down menu
- Click Save and Close if this is the only contact to add, or Save and New if you need to add more contacts
Once all Components of the Purchase Order have been added, click Save and Close to close the New Purchase Order form. The Purchase Order you have created will now appear in the table of the Purchase Orders section.
View a Purchase Order
You can view all the components of a Purchase Order as they are stored in IPM, and IPM also enables you to preview your Purchase Orders in PDF format to see how they will appear to the receiver once they are sent or printed out. All of these require you to foll
ow these steps first:
- In the drop down navigation menu, click on IPM Contract Control > Purchase Orders
- All Purchase Orders created for the selected Job will appear in the table
To View in IPM
- Double click on each Purchase Order to view it
- The Purchase Order will open in a new window and you can view all components of it by clicking on each of the options in the drop down menu
To Preview the Purchase Order
- Make sure the Purchase Order you wish to view is highlighted in blue by clicking on it
- Click on Preview in the top menu
- The Report Viewer will open and display the Purchase Order as it would look as a PDF file
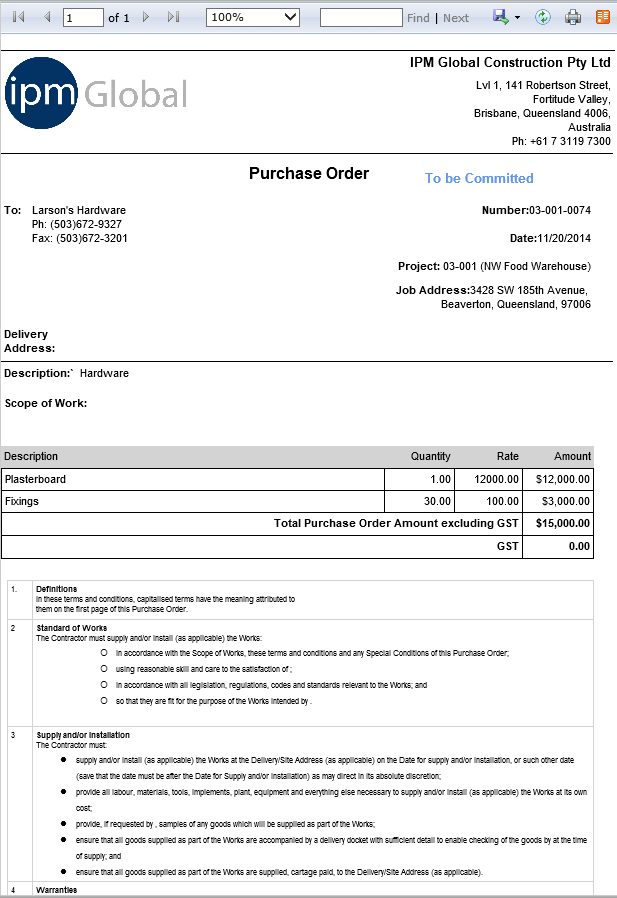
Note: As this is simply a preview, you cannot Save the Purchase Order from this view. In order to do this, you must create the actual PDF file first. See the next item below.
To Create as a PDF and Print
- Make sure the Purchase Order you wish to view is highlighted in blue by clicking on it
- Click on Create PDF in the top menu to create a PDF of the Purchase Order
- The PDF box will open and you can choose to Open or Save the PDF (if you choose save, open the PDF once it has been saved in your desired location)
- The Purchase Order will open as a PDF file
- Click on the Print icon in the top menu